Hello friends. Today you will learn how to fix Bluestacks Could Not Start Engine on your Windows 10 PC. For a long time, Bluestacks has been the choice of many Windows 10 users who want to play or run Android games and apps.
With its extensive use, some users always face challenges using Bluestacks. One of the daunting problems is when you get a notification that Bluestacks could not start the engine. So, when you get such an issue, how do you fix it?
In this guide, you will get to know about various methods on how to fix this problem. Let’s start.
8 ways to Fix Bluestacks Could Not Start Engine
Here are the recommended methods you need to use to fix the Bluestacks that could not start the engine.
1. Change Graphics Mode and Storage
For Bluestacks to successfully run in your Windows 10 PC, it requires to have either DirectX or OpenGL graphic modes. However, OpenGL is the automatic visual mode when you install Bluestacks on a Windows 10 PC.
Though when you encounter this problem, it’s best to change the graphic mode from OpenGL to DirectX.
So, here are the steps to follow when changing your graphic mode and storage.
- Launch Bluestacks and navigate to Settings

- Then Click on Engine and Choose graphics mode to select DirectX

- Next, go to Performance, and you should set it to be custom for you to change the Memory.
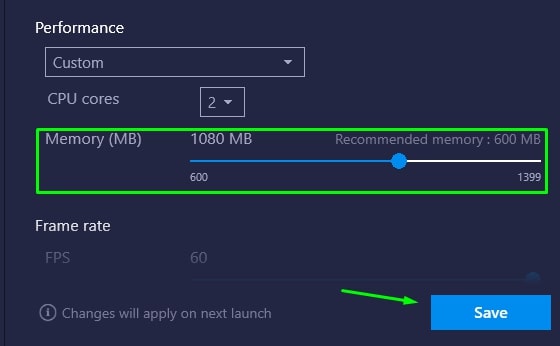
- When you are done, click on Save. Then Restart Bluestacks for the settings to apply.
For the storage part, you need to put the recommended Custom Memory Storage. Also, don’t forget to set the CPU cores as per your PC’s processor when you are done with the above steps. Restart your PC then launch Bluestacks. In case the problem occurs, try the next method.
2. Disabling or Uninstalling All Antivirus Programs
The one thing that doesn’t allow running of Bluestacks in a Windows 10 PC is an antivirus program. When you have any other installed Antivirus program apart from Windows Defender, you need to uninstall the antivirus software you are currently using.
But you only need to disable Windows Defender for Bluestacks to work correctly on your Windows 10 PC.
Uninstalling Antivirus Software
- To uninstall another antivirus program on your PC, you should open Control Panel and go to Programs and select to Uninstall a Program.
- A new tab File Explorer tab will open. Search for the antivirus program and right-click it and select uninstall.
Disabling Windows Defender
- To disable Windows Defender open Windows Security.
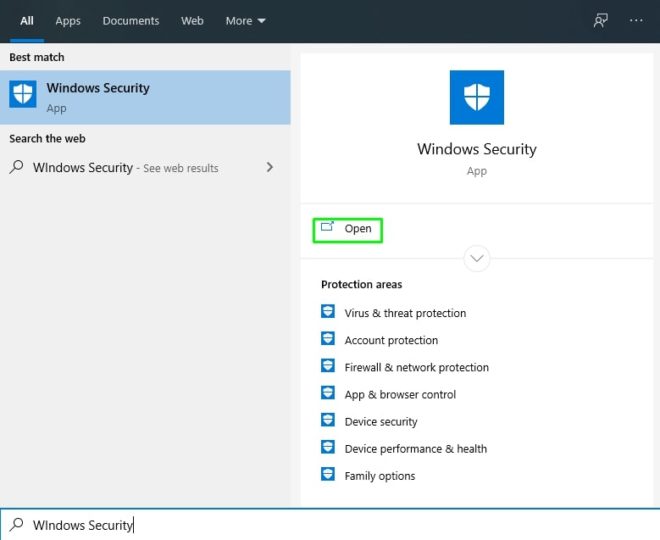
- Then go to Virus & threat protection.
- Next on the virus & threat protection setting open Manage Settings.
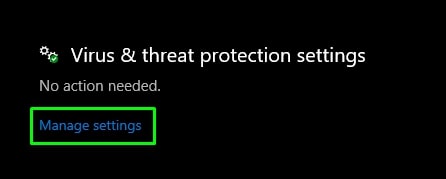
- Turn off real-time protection.
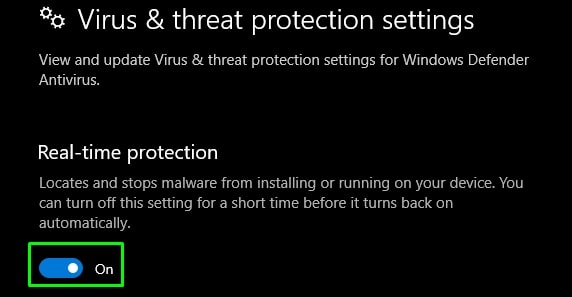
- By doing so, you will have disabled Windows Defender on your Windows 10 PC.
NB: You can also disable the antivirus software you are using on your PC.
In case you are using Avast, Antivirus read How to Disable Avast Antivirus in Windows 10 Temporarily.
3. Uninstall Bluestacks and Install the Latest Bluestacks Version
When you are using an outdated version of Bluestacks, the chances of you experiencing this issue is high.
Presently, the latest version of this Android emulator is Bluestacks 4.
Therefore, if you are using the previous version and you are encountering this problem, then you need to uninstall Bluestacks and download the latest version of Bluestacks.
Remember, you need to uninstall Bluestacks from your PC entirely, and no file, registry entries, or folder remains in your PC. To realize this, you require powerful uninstalling software like IObit Uninstaller or Revo Uninstaller Pro.
If you are not in a position to download an uninstaller program, you can follow these steps.
- Go to Settings by pressing Windows + I
- Then open Apps & Features
- Select Bluestacks then click Uninstall
After doing so, you need to download files and folders in the temporary folder. To do so, use this procedure.
- Open the Run box by pressing Windows + R
- Then type %temp% and press OK.
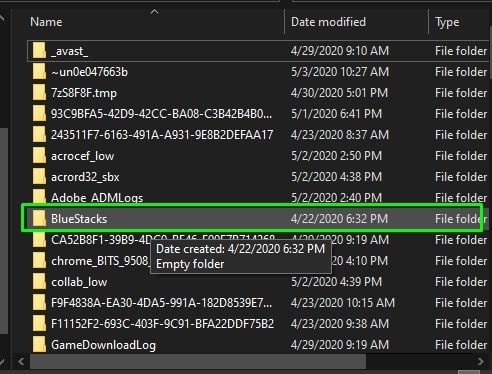
- Open the Bluestacks Folder and select all files and folders by pressing CTRL + A
- Lastly, permanently delete the Bluestacks temporary folders by pressing Shift + Del.
When you are done to uninstall Bluestacks using either of the above methods, you need to install a new version of Bluestacks.
Download the latest version of Bluestacks by going to Bluestacks.com.
Ensure you download a 64-bit setup.
Finally, install the downloaded Bluestacks setup, and don’t forget to change the graphics mode to DirectX when the installation is done.
4. Enabling Virtualization
Another method you can use to solve this problem is by enabling your Windows 10 PCs virtualization.
Before you enable virtualization, you must ensure your PC supports it. Your PC might have an Intel or AMD processor.
To check your PC’s processor, go to System Information and check your PC’s processor.

Next, you need to download either the Intel Processor Identification Utility for Windows.
Then install the utility and launch it and check whether your PC has Intel Virtualization Technology. If Yes, you can enable it.
But first, if your PC uses an AMD processor, you need to download the AMD-V Detection Utility.
Install the utility and run it whether your PC has virtualization.
If so, then follow the following steps to enable virtualization on your Windows 10 PC.
- First, restart your Windows 10 PC, and depending on your PCs model, you can either press F12, ESC, F8, or F2 to launch BIOS. (Check how to open BIOS as it differs with your PC manufacturer)
- For example, my PC’s virtualization-bases security is not enabled.
- You can Restart your PC by going to Settings. Then on Update & Security, go to Recovery and Click Restart Now.
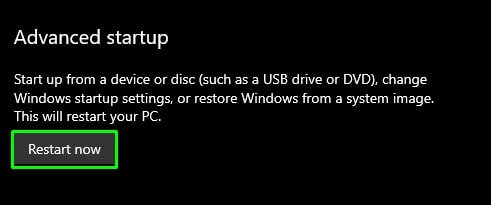
- Then on System Security Enable Virtualization Technology, press F10 to Save the Changes.
- Your PC will restart automatically, and you will need to open Bluestacks again, and the engine will start working as required.
5. Launch Bluestacks in Compatibility Mode
You can also run Bluestacks on Compatibility Mode. To set this, you need to do the following.
- Right-click your Bluestacks Icon and click on Properties

- Then go to Compatibility and tick on the box beside Run this program in compatibility mode.
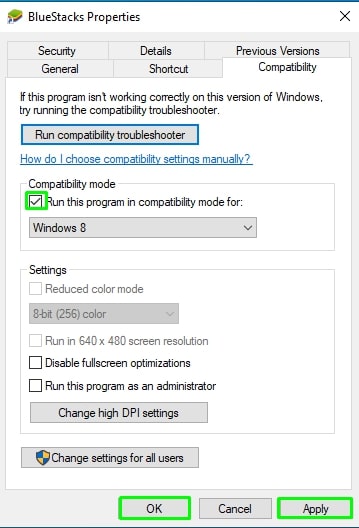
- When done, tap on Apply, then OK.
That way, you will have enabled Bluestacks to Run in compatibility mode. Now, you can open Bluestacks.
If the problem persists, try this next method.
6. Upgrade/Update Your Bluestacks Version
You can also try out this method. You can either upgrade or update the current version of Bluestacks you are using.
How do you do that?
First, your Bluestacks Versions need to be 3.52.66.1905 and higher to upgrade or update to the latest version directly.
Next, visit the official Bluestacks website and download another setup of the Android emulator.
Then double-tap the setup as it will automatically upgrade your Bluestacks version.
NB: Remember that if your current Bluestacks Version is 3.7.44.1625 and above and lower than 3.52.66.1905, you cannot update your Bluestacks version by double-tapping the setup you download.
7. End Bluestacks Tasks
To end all Bluestacks tasks, you need to concurrently press Ctrl + Shift + Esc to open Task Manager.
You should right-click on the running Bluestacks processes and click on End Task.
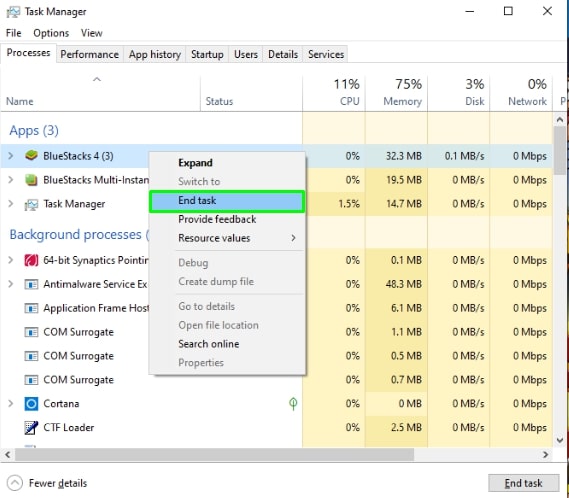
When you are done now, re-open Bluestacks, and everything will be running smoothly without any issue.
8. Update your Windows 10
Every month Windows releases new updates for those using Windows 10 PC. Thus, if your PC is not up to date, such an issue may arise.
Therefore, when you come across this problem, update your Windows 10.
Follow these steps to update Windows 10.
- Open Setting (Windows + I)
- Navigate to Update & Security
- If you had paused your updates click on resume updates
- The download will initiate, and the updates will be installed.
- Finally, restart your PC, then launch Bluestacks.
Minimum Requirements to Install Bluestacks Windows 10
One of the things that lead to this problem is your PC not meeting the Bluestacks minimum requirements.
So, what are the minimum requirements a Windows 10 PC should meet to install Bluestacks?
They include;
- First, you should be the Administrator of the Windows 10 PC
- The minimum RAM and ROM space should be 2GB and 4GB, respectively
- The graphic processing unit should be DirectX 9.0 and above
Therefore, if it meets all these, you can install Bluestacks.
What is the Latest Version of Bluestacks?
- Bluestacks 4 is the latest version and was released in September 2018.
Conclusion
These are all the methods you can use when you come across Bluestacks Could Not Start Engine. Try one at a time until you eventually fix the problem. For any other question about Bluestacks, please leave a comment and you will receive help.